Closed (f8.0)  Open (f2.2)
QuickTake 200 Aperture Selector
Copyright 1998 Jerry Farm
What is exposure compensation?
Exposure compensation is used in lighting situations when the
camera's automatic exposure might not give the desired results. The most
common example of this is when the subject is significantly brighter or
darker than the background. The camera tries to balance the exposure over
the entire frame, but this causes the subject to be over or underexposed.
By using exposure compensation, the subject can be properly exposed at the
expense of under or overexposing the background.
What happens when a picture is over or underexposed?
Digital cameras typically store the color of each pixel as three
numbers in the range 0 to 255, representing the intensities of the red,
green and blue color components of the pixel. When a picture is underexposed,
many of these values will be at or near 0, resulting in loss of detail in
dark areas. When overexposed, many values will be saturated at 255, resulting
in blown out highlights (loss of detail in bright areas). When only one
or two color components saturate, color shifts occur since the correct ratio
of the colors can't be preserved. Once pixels reach values of 0 or 255 the
detail they contained is lost forever--no amount of brightness or contrast
adjustment will bring it back.
About the QuickTake 200 Digital Camera
| Apple's QuickTake 200 digital camera has aperture-priority automatic exposure control. This means that the user sets the aperture and the camera controls the exposure by setting the shutter speed. The QuickTake 200 allows the user to select one of two aperture settings. Via flashing icons on the LCD display, the camera tells the user which aperture setting should be used to get a good shutter speed for the current picture. |
QuickTake 200 Aperture Selector |
When the aperture selector is moved to a new setting, the camera takes about 2 seconds to readjust the shutter speed. By taking a picture during this time, the camera can be tricked into taking the picture with a different exposure. This provides a method of exposure compensation.
How to perform exposure compensation
The process is simple, but requires a bit of dexterity.
You can vary the amount of exposure compensation by varying the length of time between sliding the aperture selector and pressing the shutter release. A very short delay will give the maximum compensation; a delay of two seconds or more will give little or no compensation.
What's happening here?
Let's take the example of a bright subject against a dark background, where
you want to decrease exposure. You start out with the aperture selector
in the open position to let in as much light as possible. The camera sets
a faster shutter speed to compensate. Just before taking the picture you
slide the aperture selector to the closed position, reducing the amount
of light entering the camera. The camera begins to slow the shutter speed
but you take the picture before it can completely readjust. At the moment
you take the picture the shutter speed is still "too fast" for
the closed aperture, reducing the exposure.
Why not just set the aperture?
In extreme lighting conditions you might be able to get exposure compensation simply by setting the aperture. However, much of the time the QuickTake 200 should get about the same exposure regardless of how the aperture is set. This is because it has a shutter speed range of 10 stops, versus only a 4 stop difference between aperture settings. (A stop represents doubling or halving the amount of light exposing the picture. Apertures follow a square law progression, so aperture stops over the camera's range are 8.0, 5.6, 4.0, 2.8, 2.0, where 2.0 is close enough to the camera's f2.2. To be precise, the aperture range is log2((8/2.2)^2) = 3.7 stops.) The wide shutter speed range gives a wide range of lighting where the camera can get the same exposure with either aperture, as shown in the highlighted section of the table to the right. Thus, when you change the aperture setting, there is a good chance the camera can readjust the shutter speed enough to completely offset the aperture change. This doesn't mean that the aperture selector is useless--normally it allows the camera to be used over a wider range of lighting with shutter speeds fast enough to reduce image blur due to the motion of a hand-held camera. (Note: This list may not show the actual shutter speeds used by the QuickTake 200. It only illustrates the range of shutter speeds measured in stops. I've heard that the QuickTake 200's max shutter speed is 1/4000, so I've used that number above since it fits the standard progression. The advertised max speed is 1/5000, which would make a range of over 10 stops.) |
|||
| Closed (f8.0) |
Open (f2.2) | ||
|---|---|---|---|
| 1/4000 | - | ||
| 1/2000 | - | ||
| 1/1000 | - | ||
| 1/500 | - | ||
| 1/250 | 1/4000 | ||
| 1/125 | 1/2000 | ||
| 1/60 | 1/1000 | ||
| 1/30 | 1/500 | ||
| 1/15 | 1/250 | ||
| 1/8 | 1/125 | ||
| 1/4 | 1/60 | ||
| - | 1/30 | ||
| - | 1/15 | ||
| - | 1/8 | ||
| - | 1/4 | ||
Retouching Pictures
Sometimes the picture will come out a little too dark or too light as a result of overcompensating (not allowing enough delay before shutter release). When this happens you can use a program like Camera Access, PhotoDeluxe™, or GraphicConverter to adjust the picture's brightness and contrast. GraphicConverter's Levels command is also good for this since it can restore the full range of brightness without saturating a lot of pixels.
Example Pictures
Some examples of exposure compensation are shown below. All pictures were
taken with an Apple QuickTake 200 camera. The example pictures have not
been modified in any way other than resizing and cropping. The pictures
may appear somewhat dark on non-Macintosh computers.
Red-green-blue (RGB) histograms accompany the pictures. They show the effects that exposure compensation has on the red-green-blue component values in the pictures. The histograms run from 0 (dark) on the left to 255 (bright) on the right. The height of the histogram at each of these 256 points represents the number of pixels with the corresponding brightness. When a lot of pixels are at 0 or 255, that indicates that some part of the picture is under or overexposed.
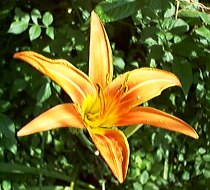
Example 1: Bright Subject Against a Dark Background
The aperture selector is slid from open to closed just before pressing the shutter release.
Left: Auto exposure. The dark leaves in the background have caused the camera to overexpose the flower. The flower's colors have been washed out. Orange pales to yellow on the bright areas of the flower petals. The inside of the flower appears pure yellow where it really has a green tint. The spike at the right end of the red histogram (below) shows a large number of pixels are saturated in red. These pixels correspond to the areas on the flower petals that have paled to yellow. Because the red is saturated, as the green becomes brighter in these areas it turns the orange to yellow.
Right: With exposure compensation. The orange is more consistent over the petals, more accurately representing the true color of the flower. A green tint is now visible inside flower (it is somewhat more evident in the full-size image). The red histogram shows there are still some pixels that are saturated in red, but only about 1/4 as many as before. The red saturation could have been reduced further by shortening the delay between sliding the aperture selector and pressing the shutter release. The background is generally underexposed, as expected. Often, as in this case, this is good a good thing since it makes the subject stand out more.
Using the exposure table to compare the exposures listed below, we see that a two-stop exposure reduction was obtained. Another picture (not shown here) was taken at f/8 after the auto exposure had readjusted, giving a 1/90 shutter speed. This exposure is just slightly more than, but essentially equivalent to, the f/2.4 auto exposure (at left below), so the picture looks identical except for a slight increase in brightness and an increased depth of field. Exposure information given below was obtained using Fuji's Serial Data Transfer software "Sdt7mac202." This software reports the aperture as f/2.4 rather than f/2.2. At this time I'm not sure which number is correct for the QuickTake 200, but they're close enough.
Auto Exposure |
Switched Aperture (Open to Closed) |
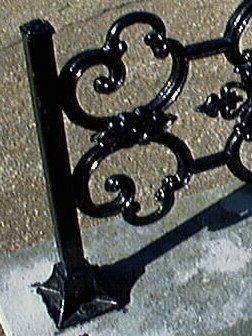
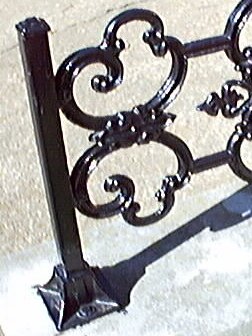
Example 2: Dark Subject Against a Bright Background
The aperture selector is slid from closed to open just before pressing the shutter release.
Left: Auto exposure. The bright cement has caused the camera to underexpose the iron work. The iron work is almost completely black with little detail visible. The histograms show large numbers of pixels at or near values of zero.
Right: With exposure compensation. Much more detail is visible on the scroll work, where it attaches to the post, and at the base of the post. Also, the reflection of the blue sky is now visible on the top of the post and scroll work. The histograms show that the pixels that were piled up at the left end have now moved to the right and spread out, accounting for the increased detail visible in the dark areas of the picture. Also, the bumps in the middle of the original histograms have moved right and there is now a significant number of pixels that are saturated. This corresponds to the areas of cement that are now overexposed.
Auto Exposure |
Switched Aperture (Closed to Open) |
For more info on the QuickTake 200, see the Apple QuickTake 200 product description, and the Technical Specifications.
For even more info and tips, see Andy Baird's QuickTake 200 and Fuji DS-7 page.
To see other pictures taken with a QuickTake 200, look here and here.
Created: 14 Jun 1998
Updated: 09 Jun 1999